
Click the  button on any transaction screen to open the Billing screen
Creating a Bill Only Transaction can also be done if no transaction exists for the billing

|
Menu Option |
Description |
|
File - Save |
Save the current billing transaction. |
|
File - Exit |
Close the current billing transaction, and exit the billing screen. |
|
Tools - Recalculate |
Use this tool to recalculate the fees on this billing invoice. This should be used each time that changes are made to the entry which may affect the fees on this bill. (Ex. If the HTS is changed, this may change the duty amount to be billed.) |
|
About |
View information on the billing module being used. |
|
Field/Button/Tab |
Description |
|
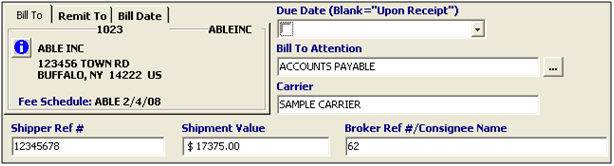
Bill To/Fee Schedule |
This area displays the Bill-To party and the Fee Schedule, as selected in the transaction. You must change the bill-to/fee schedule on the transaction screen. |
|
Remit To |
Enter the Remit-To party, if this billing is to be remitted to someone other than yourself. This will default to the address shown in the broker profile. |
|
Bill Date |
Enter the date of the billing invoice, or choose from the calendar by clicking the drop-down. This will default to today’s date. |
|
Due Date |
Enter the due date for this billing invoice, or choose from the calendar by clicking the ellipsis. If you leave this blank, upon receipt will be the default due date. |
|
Bill To Attention |
Enter the attention to party as it will appear on the billing invoice. This will default to Accounts Payable, but you can manually edit this or choose from the contacts pick-list by clicking the ellipsis. |
|
Carrier |
Enter the carrier for the associated shipment. This will default from the carrier name that is entered/selected in the release/entry editor. |
|
Shipper Ref # |
Enter the shipper’s reference number for this shipment. This will default from the shipper’s reference number that is entered on the transaction page. |
|
Shipment Value |
Enter the shipment value for this shipment. This will default from the value that is entered on the transaction page. |
|
Broker Ref #/ Consignee Name |
Enter the broker reference number, or the consignee name for this billing invoice. This will default from the broker reference number that is entered on the transaction page. |
|
Field/Button |
Description |
|
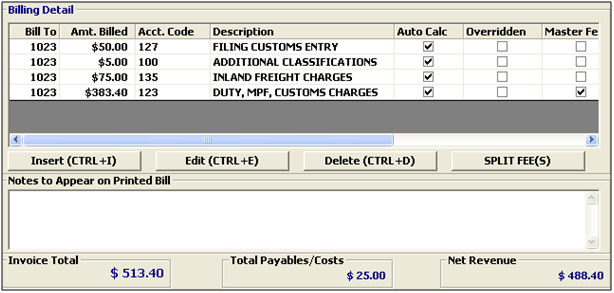
Insert |
Click to add a new fee to this billing invoice. This will open a new item in the Add a Fee screen. |
|
Edit |
Click to edit the selected fee. This will open the selected item in the Enter/Edit Fee Amount screen. |
|
Delete |
Click to delete the selected fee from this billing invoice. |
|
Split Fees |
Split the selected fee. This will allow you to bill a specific fee (or a portion of the fee) to another bill-to client. |
|
Notes to Appear on Printed Bill |
Enter any notes to appear on this billing invoice. |
|
Invoice Total |
Displays the total, as shown on the invoice. This is the amount owed by the bill-to party on the due date. |
|
Total Payables/ Costs |
Displays the total of all payables and costs associated with this transaction. |
|
Net Revenue |
Displays the total net revenue for this billing transaction. This is the invoice total minus the total payables/costs. |
Click Insert/Edit to Add/Edit a Fee
Once you’ve completed your bill, review the other sections of this billing manual:
Manage your billings using the Billing Tools grid.
View associated billings/transactions via the Transaction Tree.
Be sure to review the Additional Billing Features as well.